Posts

Showing posts with the label Christmas Crafts

Homemade Initial Letter Cards

Image
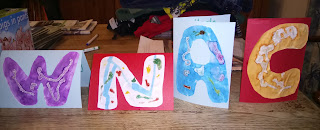
Make personal initial letter homemade cards for birthdays or Christmas. You will need...  A4 white paper Paint Glitter glue tubes/pens Coloured card Scissors What to do...  Paint A4 paper in desired colours.  Then add dabs and swirls of glitter glue.  When dry cut out initial letter.  Fold A4 coloured card in half, then half again to make 2 cards.  Glue initial letter to front of the card.  We love these simple, personal handmade cards. 

Robin Thumb Print Christmas Card

Image
We have made a simple robin thumb print Christmas card this weekend. You need: A4 white paper.  Black felt tip pen.  Glue.  A4 Coloured card.  Red paint.  Envelopes.  Gold, silver or white glitter pen.  What to do...  Cut up white A4 paper into six squares.  Draw different robin outlines. The children can then trace the different outlines onto the paper squares or draw their own. Dab thumb into red paint and make a red thumb print for the robin's red breast.  When the paint is dry, glue the square onto folded coloured card.  Write Happy Christmas on the front.  Write message inside.  We stuck some sequin snowflakes on the front.  We love these simple Christmas cards. 

Artstraws Christmas Tree Christmas Card

Image
Create a Christmas Tree on a Christmas card using artstraws. You will need...  Artstraws - various colours A4 coloured card Glue Fold the card in half.  Choose coloured artstraws for the tree.  Cut up the artstraws in to different sizes, start with one nearly as wide as your folded card, then cut a slightly smaller piece each time, until you have enough to make a tree shape.  Glue the artstraws onto the card so they form a triangular tree, getting smaller as they go up the card. You can add straws to make a trunk for the tree, snow on the ground, snow flakes in the sky and a star on top of the tree. 

Make Clay Christmas Ornaments

Image
Make Clay Christmas ornaments and decorations for the tree. You will need  Air drying clay Rolling pin Shaped cutters and Christmas shaped cutters.  Pencil Ribbon Paints Glue/Midge Podge Glitter Foil Tray Cover table with a wipeable plastic sheet.  Roll out the clay.  Use cutters to create different shapes.  Use a pencil point to form a hole in the ornament for hanging it up.  You can add markings and indentations to the clay to create shapes, faces, date, name etc Place the clay shapes onto foil on a tray to dry for a few days.  Paint the ornaments when the clay has dried.  You could add some glitter to the paint for extra sparkle.  When the paint is dry, paint the backs.  Once dry seal the paint with glue or modge, podge. Leave to dry and repeat on reverse.  Tie some ribbon through the hole so the ornament can hang on the Christmas tree. These make lovely gifts.