Posts

Showing posts with the label Plants

Paint Dripped Plant Pot

Image
Paint drip a plant pot as a present or to cheer up your patio. Paint a terracotta plant pot white and leave to dry. From the base drip different coloured paints down the sides. Leave to dry. Seal with varnish or modge podge. Plant up the pot. We are planting a sunflower so we can give to grandparents so they can think of their grandson when they look at the sunflower. We'll share a picture when we've planted it.

Wax and Water Colour Leaf Rubbings

Image
I have tried out wax and water colour leaf rubbings. Collect leaves that will make good wax rubbings. Take care to collect non poisonous leaves. (Note rhubarb leaves are poisonous as an example.) Place a sheet of paper over the top and using white wax crayons do wax rubbings of the leaves. Then paint over the leaf prints with water colour paints. I did a different colour for each leaf.

Life Cycle Of A Plant Mobile

Image
Life Cycle Of A Plant. We watched the video clip on BBC bitesize on the life cycle of a plant. https://www.bbc.co.uk/bitesize/topics/zgssgk7/articles/zyv3jty Then on white card cut into circles, we drew the 6 stages of the life cycle of the plant. The seed starts to grow shoots and roots in the ground.  The seed germinates and the shoot grows and appears above ground.  The seedling produces leaves which absorb sunlight in a process called photosynthesis.  The flower head grows, makes pollen and attracts bees, this is called pollination.  The fertilisation of the flower takes place and tiny seeds are produced.  Seed dispersal takes place usually when the flower head dies off. Seeds can be dispersed by the wind, drop to the ground or moved by animals.  The process then starts again with the new seeds, the life cycle begins again. We drew the pictures on the front of our cards and wrote what happened on the back. We hole punched the card a...

DIY Plant Pots For Sowing Seeds

Image
Make a plant pot for sowing seeds from toilet roll holders and kitchen roll holders. Cut kitchen roll holder in half so end up with two the size of toilet roll. Cut vertical cuts at one end about 2 cms high, usually about 4/5 cuts, then fold the flaps in to make a base. I didn't tape the bottom. Hold bottom when fill with compost and plant seed. Place into a container (margarine/icecream tub to keep in place.) When seed germinates and seedling ready to transplant, put whole thing in the ground as holder will decompose in the ground.

Sprouting Beans

Image
Grow some beans. We soaked some bean seeds we'd saved last year. A day later we put napkins in jam jars and soaked it in water. We added the bean seeds and put them in the airing cupboard to see what happens. After a few days some of the bean seeds have started to sprout roots and shoots. Once the seeds sprout, move the jars to a light place. Keep them wet. Talk about what plants need to grow. Water, air (carbon dioxide), light and nutrients. After a week or two plant them in pots of soil or compost. Ask why do you think the beans grow shoots shoots in the dark cupboard. Putting them in a dark cupboard (with warmth and water) encourages them to seek light and sprout.

How Do Plants Take In Water? Experiment

Image
I asked how do plants take in water? Thomas said by it's stem and roots. (I wrote down what Thomas said.) We talked about what plants need to grow. Water, nutrients in soil, air (carbon dioxide co2) sunlight. I asked what will happen when we put the cut flower in coloured water? Discuss prediction thinking about why. Thomas' prediction was... I think the flower will go greeny blue because the water will go up the stem and make the flower go blue. After a few days we looked at the flower and dissected the flower so we could see what happened. We discussed what we found. We could see blue water in the hollow stem and in the veins in the petals. Conclusion - What I found out... The flower takes in nutrients and water through the veins in the petal by the stem, we know this because the petal veins are greeny blue.

Parts of a Flowering Plant - A Daffodil

Image
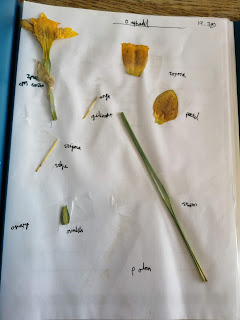
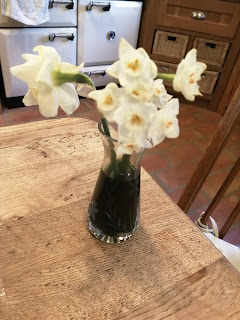
Look at the parts of a Flowering Plant. Pick a flower from the garden, we picked a daffodil. (Just be careful when picking flowers as some can irritate the skin, daffodils have a liquid sap that can irritate the skin. You could wear gloves or you touch the flower and wash hands after touching the flower. ) We cut the flower down the middle and looked at the different parts. Adults can do this or assist depending on age of child, we used a Stanley knife. Ask the children what they think the parts are. Petals, stem, leaves, pollen. Talk about what jobs they do. Stem anchors the plant and takes in water, leaves take in sunlight, petals attract bees for pollination, pollen is made to fertilise the plant to produce seeds. Use books and the Internet for scientific info. I had googled parts of a flowering daffodil and found some images with the parts labelled which can help with the more scientific name eg stigma, stamen anther, ovule, ovary, filament, spathe, sepal. We looked...

Flowers and Coloured Water Experiment

Image
How do flowers take in water? What happens when we put flowers in coloured water? You need a white or light coloured flower eg daffodils or carnations. Food colouring, jar or vase, water.  Ask you child How do flowers take in water?  Talk about the roots taking in water from the soil and the water travels up the stem and into the veins in the petals and leaves. .  Ask them what happens when we put flowers in coloured water? You can talk about it or to extend it you can get the children to write a prediction giving a reason why.  Eg I think the petals will turn red because the coloured water travels up the stem and into the petals because flowers need water to live.  Put the cut flower into a glass jar or vase add water and some drops of food colouring - blue or red work well. Wait a day or so to see what happens.